
A teacher I know prints the same worksheet packet every Friday. Page one is the instructions, page two is the practice sheet — and she needs that practice sheet twice, once for classwork and once for homework. For months she did it the slow way: print the PDF, photocopy page two, then shuffle the copies back into the right order by hand.
There’s a much easier way. If a page in your PDF needs to appear twice — or three times — you can duplicate it right inside the file, in about thirty seconds, and print the whole thing in one go.
When duplicating a page actually saves you
It’s one of those things you don’t think about until you need it. A permission slip that has to be signed twice and stapled into the same packet. A form where the same page gets filled in by two different people. A booklet where the cover page also belongs at the back. Or a handout where the practice page needs repeating so every student gets two copies without you standing at the copier.
Whatever the reason, the fix is the same: make the copy inside the PDF itself, then print or send the file once.
How to duplicate pages in a PDF
You’ll need the free Duplicate PDF Pages tool. No app to install, no account, and your file never leaves your browser — everything happens on your own device.
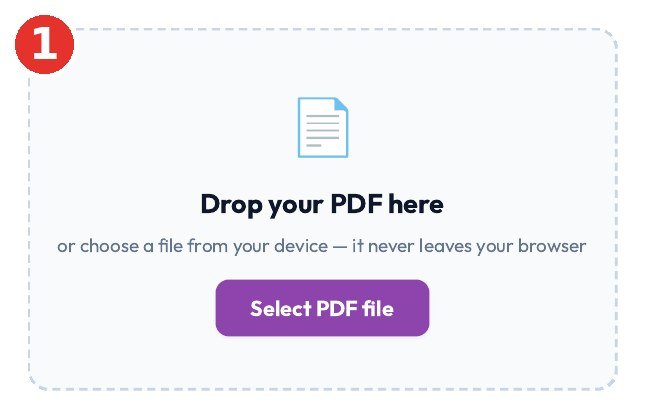
Step 1: Drop your PDF into the tool
Open the tool and drag your PDF onto the upload box, or click Select PDF file and pick it from your device. The file stays in your browser the whole time, which matters if it’s anything with names or signatures on it.
Step 2: Tap the pages you want to repeat
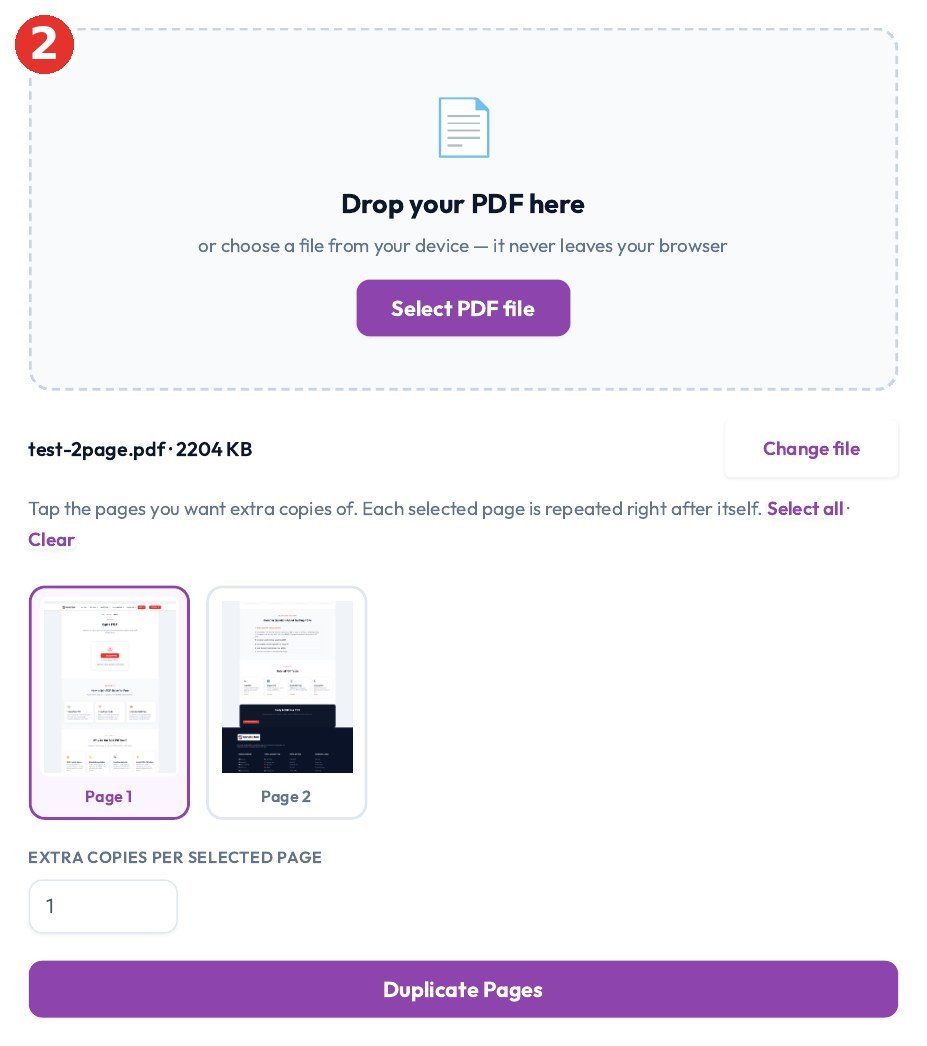
Once the file loads, you’ll see a thumbnail of every page. Tap the ones you want extra copies of — the selected pages get a purple outline. Each selected page is repeated right after itself in the finished file, so the order stays exactly as you’d expect.
Under the thumbnails there’s a box labelled Extra copies per selected page. It starts at 1, which means one extra copy of each page you picked. Want a page three times in total? Set it to 2. Need every page doubled, like a two-up handout? Hit Select all instead of tapping pages one by one. And if you tap the wrong one, Clear wipes the selection so you can start over.
Step 3: Hit Duplicate Pages and download
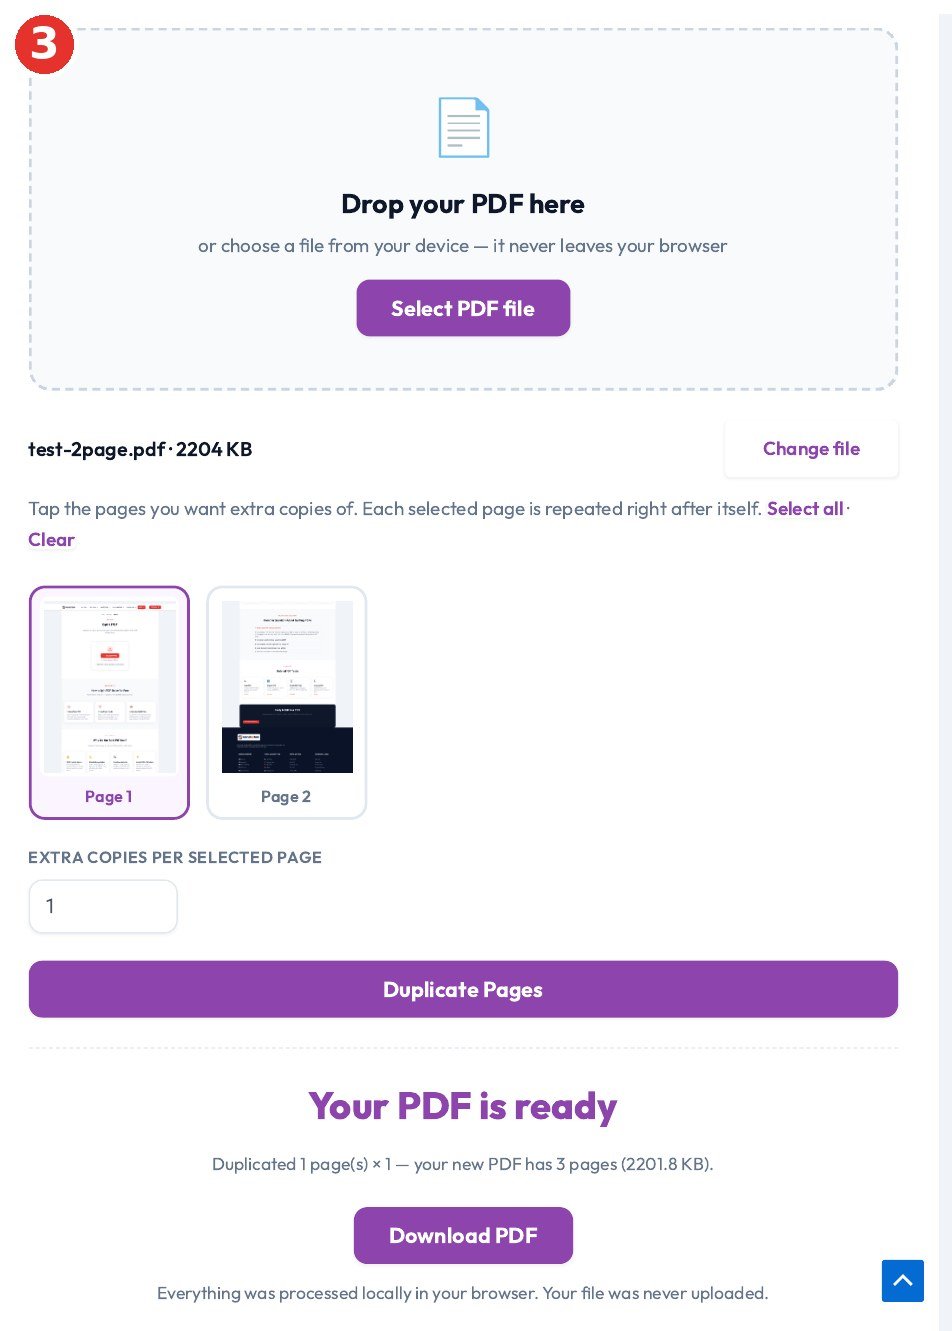
Click the big Duplicate Pages button and the tool builds your new file. A two-page PDF with one page duplicated becomes a three-page PDF — the result line tells you exactly what happened before you download, so there’s no guessing. Then click Download PDF and you’re done. The original file on your computer is untouched; the download is a brand-new file.
A few things worth knowing
First, the copies land directly after the original page. That’s what most people want — the repeated handout sits right next to the first one. But if you actually need the copy at the very end of the document, duplicate it first and then reorder the pages afterwards; trying to do both jobs at once just causes confusion.
Second, keep the copies sensible. The tool will happily make ten extra copies of every page, but a 40-page file turns into a 400-page file fast, and your printer will not thank you. I usually do one or two extra copies and re-run it if I need more.
Third, big scanned PDFs take a little longer. A regular 2 MB file like the one I tested finishes instantly. A 50 MB scan of a textbook will chug for a few seconds — that’s normal, it’s still all happening in your browser.
Questions people ask
Does this change my original PDF?
No. The tool reads your file and builds a separate new one. Your original stays exactly as it was.
Can I duplicate more than one page at once?
Yes — tap as many pages as you like, or use Select all to double the whole document. Every selected page gets the same number of extra copies.
Will the duplicated page look identical?
It’s an exact copy of the page — same text, same images, same layout. Nothing gets re-rendered or compressed.
Does it work on a phone?
Yes. It’s a browser tool, so it works on phones, tablets, and computers. On a small screen the page thumbnails are just a bit smaller to tap — zoom in if your PDF has a lot of pages.
Is there a file size limit?
There’s no upload, so there’s no server limit — but your browser still has to hold the file in memory. Everyday files are fine. If you’re working with a huge scanned document, try it with a smaller test file first.
That’s the whole job. Next time a page needs to appear twice, don’t reach for the photocopier — duplicate it inside the PDF and print once.

দোকানের ফেসবুক পেজে একটা ছবি দেবেন — ছবির ওপর “ঈদ অফার ২০% ছাড়” লেখা থাকলে কেমন হয়? অথবা বন্ধুর জন্মদিনের ছবিতে তার নামটা সুন্দর করে বসাতে চান? আমি নিজে এই কাজটা এতদিন ফোনের অ্যাপ দিয়ে করতাম — অ্যাপ নামানো, অ্যাড দেখা, তারপর আবার ওয়াটারমার্ক সরানোর ঝামেলা। এখন ব্রাউজারেই হয়ে যায়, দুই মিনিটের কাজ। কোনো অ্যাপ লাগে না, সাইন-আপও না।
কীভাবে করবেন — মাত্র ৩ ধাপে
ধাপ ১: ছবিটা তুলে দিন
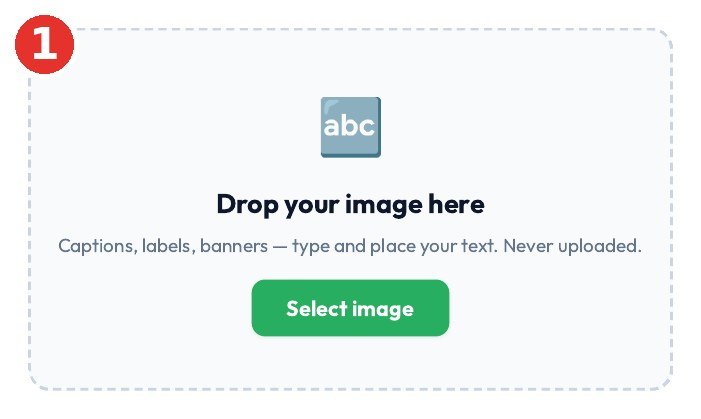
প্রথমে Add Text to Image টুলটা খুলুন। সামনে একটা বাক্স আসবে — “Drop your image here” লেখা। ছবিটা টেনে বাক্সে ছেড়ে দিন, অথবা সবুজ “Select image” বাটন চাপলে ফোনের গ্যালারি খুলে যাবে। JPG, PNG — যেকোনো সাধারণ ছবিই চলবে। আর একটা কথা: আপনার ছবি কোথাও আপলোড হয় না, সব কাজ আপনার ব্রাউজারের ভেতরেই হয়।
ধাপ ২: লেখাটা টাইপ করুন, সাজিয়ে নিন
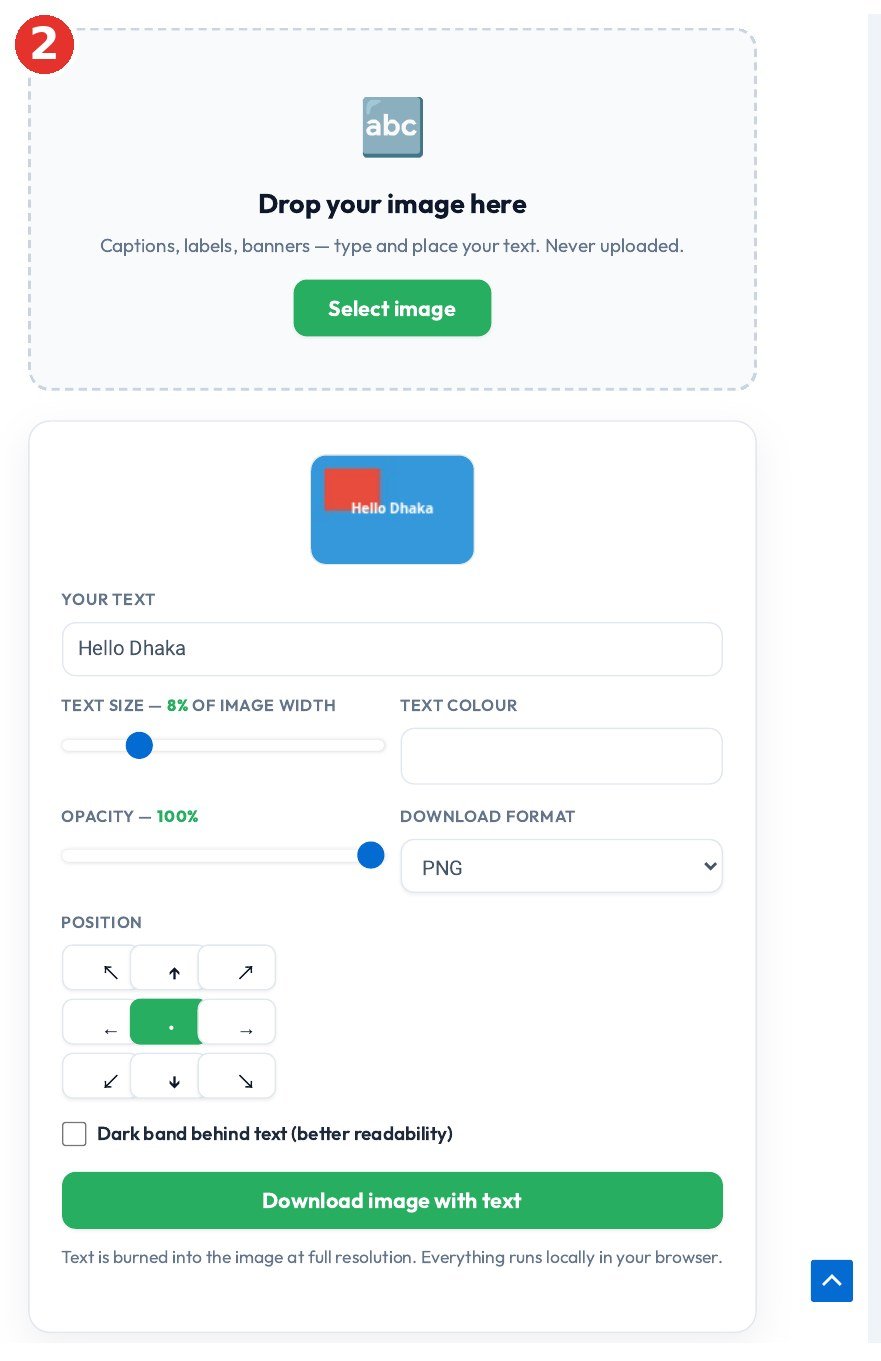
ছবি উঠে গেলেই নিচে “Your Text” ঘরটা আসবে। এখানে যা লিখতে চান লিখুন — দোকানের অফার, কারও নাম, “ঈদ মোবারক”, যা খুশি। বাংলা লিখলেও চলবে, লেখার সাথে সাথে ছবির ওপরে প্রিভিউ দেখা যাবে।
তারপর একটু সাজানোর পালা। Text Size স্লাইডার দিয়ে লেখা ছোট-বড় করুন — ডিফল্ট ৮% বেশিরভাগ ছবিতেই ঠিকঠাক বসে। Text Colour থেকে রং বদলান, আর Opacity কমিয়ে লেখাটা হালকাও করতে পারেন। সবচেয়ে কাজের জিনিসটা হলো Position-এর ৯টা ঘর — লেখাটা ওপরে, নিচে, মাঝখানে, কোণায় — যেখানে খুশি এক চাপেই বসিয়ে নিন, টেনে টেনে ঠিক করার ঝামেলা নেই। ছবিটা ব্যস্ত হলে, মানে পেছনে অনেক কিছু থাকলে, “Dark band behind text” টিকটা দিয়ে দিন — লেখার পেছনে একটা হালকা কালো পট্টি বসবে, লেখা পরিষ্কার পড়া যাবে।
রং বাছার সময় একটা সহজ নিয়ম মনে রাখুন — হালকা ছবিতে গাঢ় লেখা, গাঢ় ছবিতে হালকা লেখা। ফেসবুকে দেওয়ার ছবিতে সাদা বা হলুদ লেখা বেশ চোখে পড়ে, তবে সেটা তখনই যখন পেছনটা গাঢ়। আর Opacity একটু কমিয়ে দিলে লেখাটা ছবির সাথে মিশে যায়, ওয়াটারমার্কের মতো হালকা একটা ছাপ থাকে — দোকানের নাম ছবির কোণায় বসাতে চাইলে এটা দারুণ কাজ করে।
ধাপ ৩: ডাউনলোড করুন — হয়ে গেল
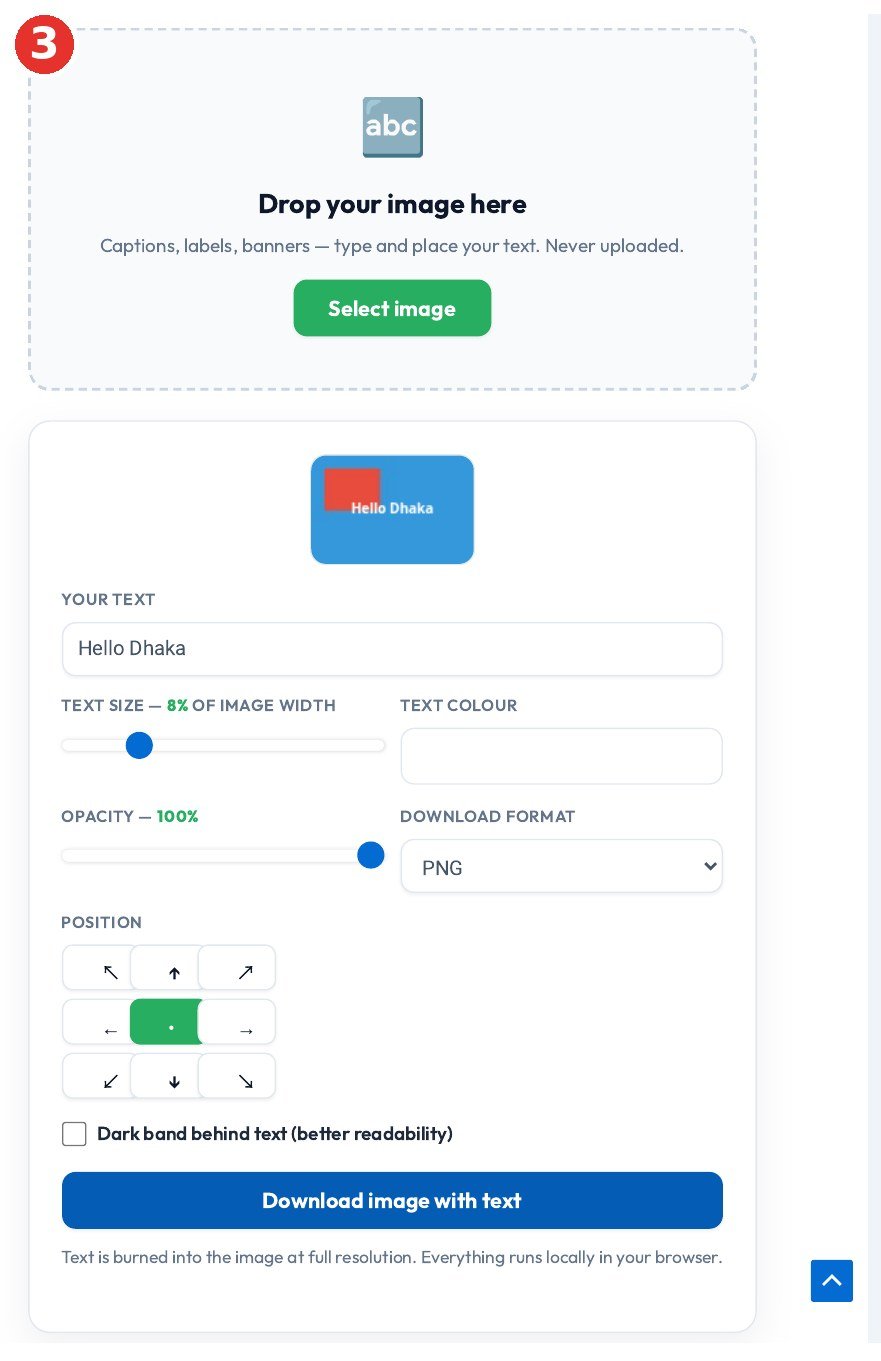
প্রিভিউ দেখে সব ঠিক মনে হলে “Download image with text” বাটনটা চাপুন। লেখাটা ছবির আসল রেজোলিউশনেই বসে যাবে — মানে ছবি ঝাপসা হবে না, লেখাও ফেটে যাবে না। ডাউনলোড ফরম্যাট থেকে PNG বা JPG, যেটা দরকার সেটা বেছে নিতে পারবেন। ফেসবুকে দেওয়ার জন্য JPG-ই যথেষ্ট, আর স্বচ্ছ ব্যাকগ্রাউন্ড দরকার হলে PNG নিন।
প্রথমবারে আমি যে ভুলগুলো করেছিলাম
প্রথমবার লেখার রং সাদা রেখে আকাশের ছবিতে বসিয়েছিলাম — লেখা একদমই পড়া যাচ্ছিল না। ব্যস্ত বা হালকা ব্যাকগ্রাউন্ডে সাদা লেখা বসালে Dark band টিকটা দিতেই হবে, নয়তো রংটা গাঢ় করুন। আরেকটা ভুল — লেখা এত বড় করে ফেলেছিলাম যে ছবির অর্ধেক ঢেকে গিয়েছিল। ৮% থেকে শুরু করুন, প্রয়োজনে একটু একটু করে বাড়ান। ছোট লেখাই বেশিরভাগ সময় সুন্দর দেখায়।
একটা সীমা জেনে রাখা ভালো — একবারে একটাই লেখার ব্লক বসানো যায়। ধরুন ছবির ওপরে নাম আর নিচে তারিখ — দুটো আলাদা লেখা চাই। তাহলে প্রথম লেখাটা বসিয়ে ডাউনলোড করুন, তারপর সেই ডাউনলোড করা ছবিটা আবার টুলে তুলে দ্বিতীয় লেখাটা বসান। দুই মিনিটের বাড়তি কাজ, কিন্তু ফল একদম ঠিকঠাক আসে।
কোন ছবিতে এটা সবচেয়ে কাজে লাগে? দোকানের অফার পোস্টার, ফেসবুক কভার, জন্মদিনের শুভেচ্ছা ছবি, স্কুল-মাদ্রাসার নোটিশ, ইউটিউব থাম্বনেইলের লেখা — সব। আর যেহেতু ছবি আপনার ফোন ছেড়ে কোথাও যায় না, ব্যক্তিগত ছবি নিয়েও নিশ্চিন্তে কাজ করা যায়।
সাধারণ প্রশ্ন
আমার ছবি কি সার্ভারে আপলোড হবে?
না। পুরো কাজটা আপনার ব্রাউজারের ভেতরে হয়, ছবি ফোন ছেড়ে কোথাও যায় না।
বাংলা লেখা বসানো যাবে তো?
যাবে। Your Text ঘরে বাংলা টাইপ করুন, প্রিভিউতে দেখে নিন কেমন দেখাচ্ছে — ঠিক মনে হলে ডাউনলোড করুন। ফোনের বাংলা কীবোর্ড দিয়েই টাইপ করা যায়।
এক ছবিতে দুই জায়গায় দুটো লেখা বসাতে চাই, কী করব?
একবারে একটাই লেখা বসে। প্রথমটা বসিয়ে ডাউনলোড করুন, তারপর সেই ছবিটা আবার টুলে তুলে দ্বিতীয় লেখাটা বসান। এভাবে যতবার খুশি লেখা যোগ করা যায়।
লেখা বসালে ছবির কোয়ালিটি কি কমে যাবে?
না, লেখাটা ছবির আসল রেজোলিউশনেই বসে। PNG নিলে কোয়ালিটি একদম অটুট থাকে, JPG নিলেও চোখে পড়ার মতো পার্থক্য হয় না।
এর জন্য কি টাকা দিতে হবে, বা অ্যাকাউন্ট খুলতে হবে?
কিছুই না — সম্পূর্ণ ফ্রি, সাইন-আপ ছাড়াই। ব্রাউজার খুললেই কাজ শুরু করা যায়।
ছবিতে লেখা বসানো আসলে দুই মিনিটের কাজ — অ্যাপ নামানো আর অ্যাড দেখার ঝামেলায় আধা ঘণ্টা নষ্ট করার কোনো মানে হয় না। টুলটা খুলে একবার চেষ্টা করে দেখুন, পরেরবার থেকে আর ভাবতে হবে না।
Last month I listed an old bike helmet on Facebook Marketplace. The photo was fine, the price was fair, and still nobody messaged me. Then a friend pointed out the obvious: the photo didn’t say anything. No price, no “barely used”, nothing to stop someone mid-scroll. I added “£25 — barely used” right on the photo, reposted it, and it sold the same evening.
That’s all this is. Sometimes a photo needs a few words on it — a price, a name, a date, a joke — and opening Photoshop for a 30-second job is silly. Here’s the way I do it now, in about a minute.
Step 1: Open the tool and drop your photo in
Go to the Add Text to Image tool. There’s one big dashed box on the page. Drag your photo into it, or click “Select image” and pick the file from your computer or phone. JPG, PNG, WebP — anything normal works.

One thing worth knowing: your photo never leaves your device. The tool runs entirely in your browser, so there’s no upload queue, no waiting, and no copy of your picture sitting on someone else’s server. If the photo is a family picture or a client’s product shot, that matters.
Step 2: Type your text and make it readable
Once the photo loads, you’ll see a preview with a “YOUR TEXT” box underneath. Type whatever you want on the photo. Then play with the four controls next to it, because this is where most people either nail it or ruin it:
- Text size — set as a percentage of the image width. For a caption across the bottom, 6–8% usually looks right. Anything over 12% starts shouting.
- Text colour — white works on most photos. If your photo is bright — a beach, a white wall — switch to black, or use the dark band option below.
- Opacity — 100% for prices and labels you want people to actually read. Drop it to 60–70% if the text is a watermark and you want the photo to show through.
- Position — nine spots on a little grid. Bottom-centre is the safe default for captions; top-centre works better for a “SALE” banner, because people’s eyes land there first.

The checkbox I always end up ticking is “Dark band behind text (better readability)”. It puts a soft dark strip behind your words, and on a busy photo — a market stall, a garden, a crowd — it’s the difference between text you can read and text that disappears into the background. If your photo is already dark and plain, skip it.
Quick check before you move on: does the text cover anything important? I’ve ruined a good product photo by stamping the price right across the item itself. Bottom of the frame, clear space, no faces underneath — thirty seconds of looking saves a re-do.
Step 3: Pick your format and download
Under “DOWNLOAD FORMAT”, choose PNG or JPG. PNG keeps text edges sharper — better for small lettering, like a label or a watermark. JPG makes a smaller file, which is what you want if the photo is going straight to Instagram, WhatsApp or a marketplace listing.

Hit “Download image with text” and the finished photo lands in your downloads folder, with the text burned in at full resolution — the real file, at the original size, not a screenshot of the preview. Post it, print it, send it. Done.
A few things I learned the hard way
Short beats clever. “Garage sale — Saturday 9am” gets read. A whole paragraph on a photo gets ignored. If you need more than ten words, they belong in the post caption, not on the image.
One text block per pass. The tool takes one block of text at a time. If you want a price at the bottom and a name at the top, download the first version, drop that file back in, and add the second line. Twenty extra seconds, and it looks far cleaner than cramming everything into one box.
Don’t cover the subject. The centre of the photo is where the preview puts your text by default. Move it. The product, the face, the view — that’s the point of the photo. The words are the supporting act.
Keep the original. Download the edited version, but don’t delete the untouched photo. The day you want the same picture without the “SALE” banner, you’ll be glad you kept it.
FAQ
Does the tool upload my photo anywhere?
No. Everything runs in your browser — the photo never leaves your device, and nothing is stored. Close the tab and it’s gone.
Can I add text to a photo on my phone?
Yes, it works the same way in a mobile browser. Tap “Select image”, pick a photo from your gallery, type your text, download. No app to install.
Will the text look blurry when I print it?
No — the text is burned into the image at full resolution, not pasted on as a low-res overlay. What you see in the preview is what you get. For print, pick PNG and start with the highest-resolution original you have; a tiny photo blown up to A4 will look soft no matter what tool you use.
What can I actually use this for?
Prices on marketplace listings, names and dates on event photos, labels on product shots for an Etsy or eBay shop, captions on memes, “Happy Birthday” on a photo for a card, watermarks on your own work so it doesn’t get reposted without credit. Any time the photo needs to say something by itself.
A photo with the right few words on it answers the question before anyone has to ask. Next time a picture needs a price, a label or a punchline, give it the minute it takes.

I learned this one the hard way. A few years ago I sent a client a draft proposal as a plain PDF — no watermark, no “DRAFT” anywhere. Two weeks later I found the same document floating around with someone else’s logo pasted on the first page. Nothing I could do about it. These days I don’t send anything unfinished without a watermark on it. It takes about thirty seconds, and it changes the whole conversation: this is mine, and everyone can see it.
If you’ve got a PDF that needs marking — a draft, a contract, a price list, a portfolio piece — here’s how I do it, free, in the browser, no account.
Step 1: Open the tool and drop your PDF in
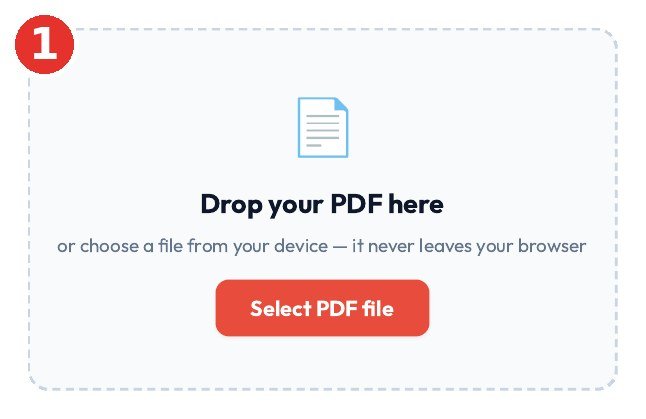
Go to the Watermark PDF tool and drop your file into the upload box, or click to pick it from your device. There’s nothing to install and no sign-up form waiting for you. Your file never leaves your browser — the stamping happens right there on your own computer, which matters when the document is something you’d rather not upload to a stranger’s server.
Step 2: Type your mark and make it look right
This is the part worth slowing down for, because a watermark that’s too faint is decoration, and one that’s too loud ruins the page.
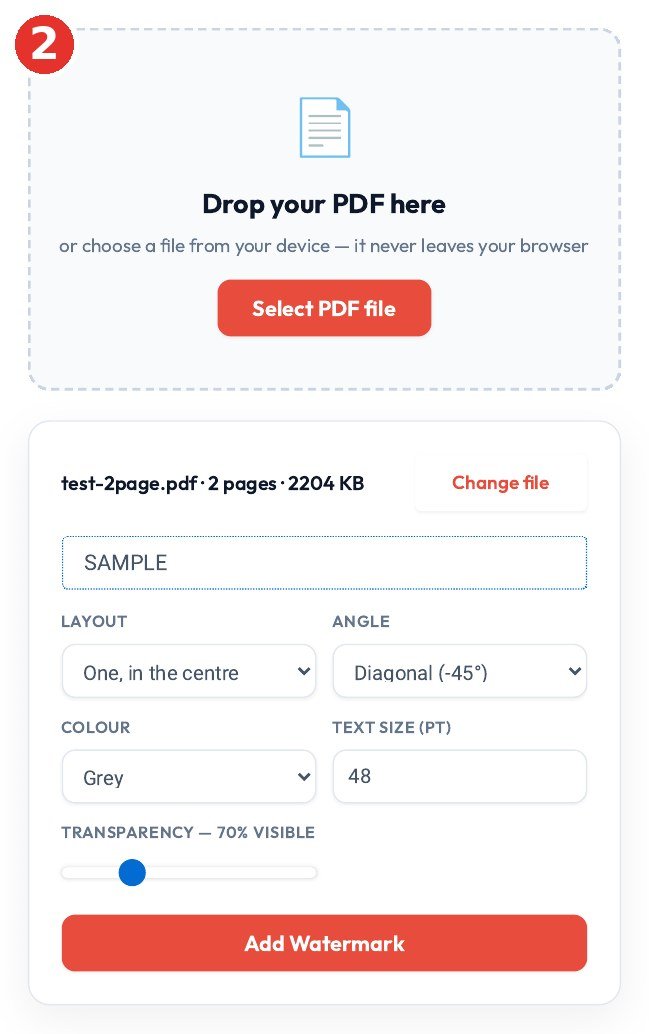
First, type the text. “DRAFT” and “CONFIDENTIAL” are the obvious ones, but your name or your business name works just as well — and for anything you’re sending out into the world, your brand name is the better choice. It turns every forwarded copy into a little advert for you.
Then pick the layout. One big mark in the centre of each page is the classic look — perfect for a draft or a confidential document. Tiled repeats the text across the whole page, which is what you want if you’re worried about screenshots or someone cropping a single page out and passing it off as theirs.
Angle matters more than people think. The diagonal at −45° is the one I use most: it reads clearly without fighting the text underneath. Horizontal works if the page is mostly images. Colour is your call — grey is the safe default, red or blue if you want it impossible to miss.
Finally, size and transparency. Around 48pt at 70% visible is a good starting point: big enough to notice at a glance, light enough that the document underneath stays readable. If the PDF is dense with small print, nudge the transparency down a touch; if it’s mostly white space, you can go bolder.
Step 3: Stamp it and download your PDF
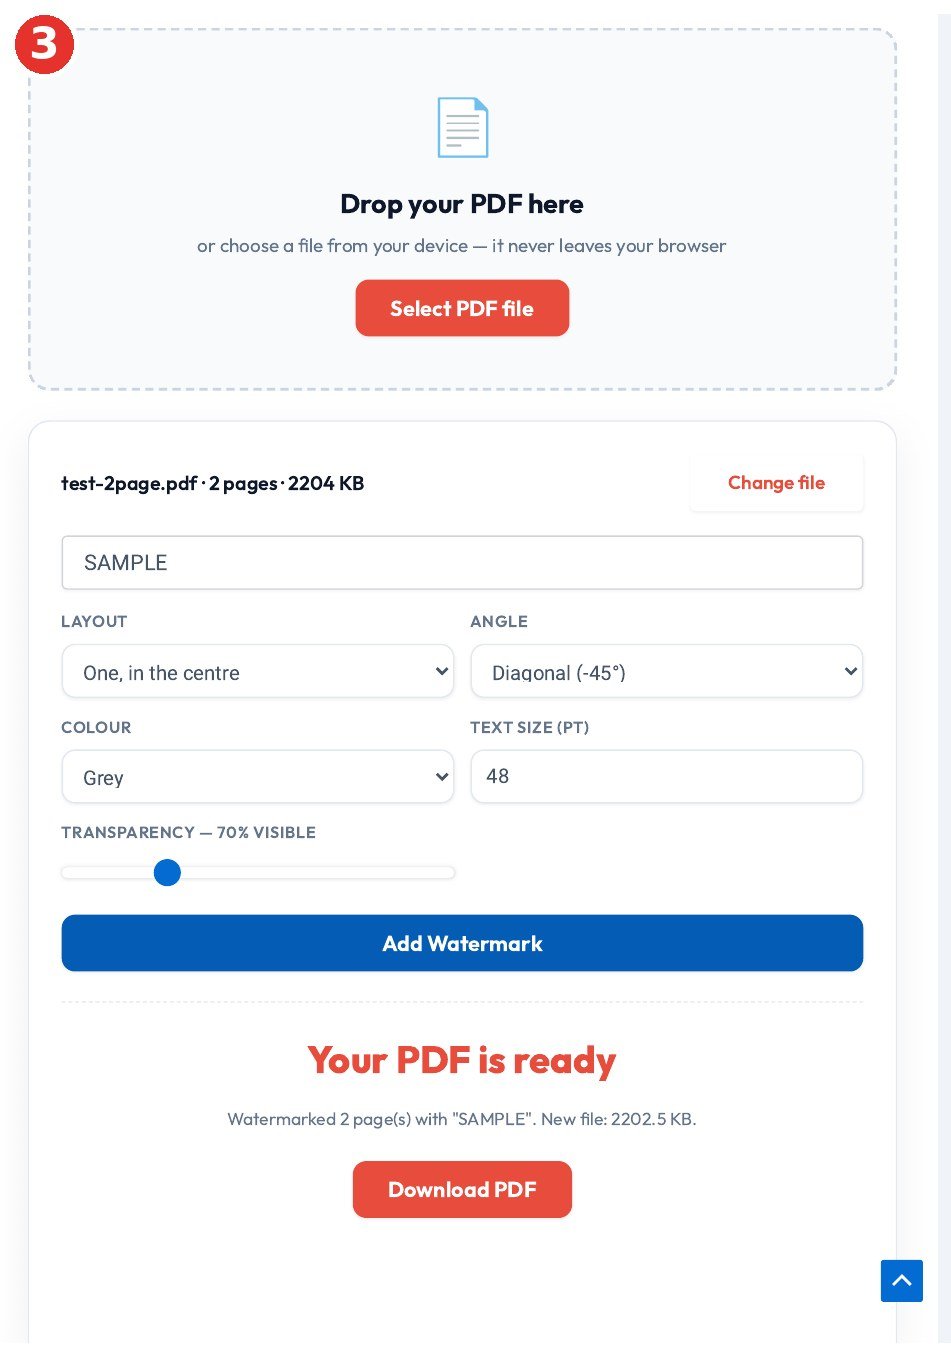
Click Add Watermark and the tool draws your mark onto every page of the document. Not as a floating layer that can be peeled off — it’s drawn into the pages themselves, so it prints with the file and travels with it wherever the PDF goes. When it’s done, hit Download PDF and save the finished file.
One habit worth keeping: hold on to your original, unwatermarked file. The watermark is deliberately hard to remove, which is the whole point — but that also means you can’t easily undo it if you change your mind. I keep a folder called “originals” for exactly this reason.
When a watermark actually saves you trouble
A few situations where I never skip it: sending a draft contract or quote before the deal is signed, sharing a portfolio or price list with a new lead, circulating anything marked confidential inside a team, and posting a sample of your work publicly. The watermark doesn’t stop a determined person with editing software — nothing does — but it stops the casual stuff, which is 99% of what actually happens: the forwarded email, the screenshot, the “oh, I thought this was ours” moment.
FAQ
Can someone remove the watermark later?
It’s drawn into each page’s content, so casual removal is hard — there’s no layer to just delete. A determined editor with the right software could still work around it. That’s true of every watermark, paid or free. Keep your unwatermarked original safe.
What’s better, centre or tiled?
Centre if you want one clear stamp that says what the document is — DRAFT, CONFIDENTIAL, that sort of thing. Tiled if you want to discourage screenshots and leaks, because the mark repeats across the whole page and can’t be cropped out.
Will the watermark show when the PDF is printed?
Yes. It’s part of the pages now, not an overlay, so it prints exactly as it looks on screen.
Is my file uploaded anywhere?
No. Everything runs in your browser — the file never leaves your device.
What text should I use?
For status, DRAFT or CONFIDENTIAL. For ownership, your name or business name. For client work, I usually combine the two: “DRAFT — Your Business Name” tells the reader everything they need to know in one glance.
That’s the whole job. Thirty seconds, one marked PDF, and nobody mistakes your work for theirs again.
গত মাসে আমার এক পরিচিত দোকানদার তার দোকানের প্রাইস লিস্টের PDF হোয়াটসঅ্যাপ গ্রুপে পাঠিয়েছিল। দুদিন পর দেখে, পাশের দোকান সেই একই ফাইল নিজের দোকানের নাম লাগিয়ে চালাচ্ছে। কষ্ট করে বানানো ক্যাটালগ, দাম, ছবি — সব ওর, শুধু নামটা বদলে গেছে। তখনই বুঝলাম, PDF শেয়ার করার আগে ওর ওপর নিজের ছাপ বসিয়ে দেওয়াটা কত দরকারি।
ওয়াটারমার্ক মানে আসলে এটাই — PDF-এর প্রতিটা পাতায় হালকা করে নিজের নাম, দোকানের নাম বা মোবাইল নম্বর বসিয়ে দেওয়া। পড়তে কোনো অসুবিধা হয় না, কিন্তু ফাইলটা দেখলেই বোঝা যায় এটা কার। আমি নিজে এখন যেকোনো PDF বাইরে পাঠানোর আগে এই কাজটা করে নিই। সময় লাগে দুই মিনিট, টাকাও লাগে না, অ্যাপও নামাতে হয় না।
কাদের কাজে লাগবে এটা
দোকানদারদের জন্য সবচেয়ে বেশি। প্রাইস লিস্ট, ক্যাটালগ, অফারের লিফলেট — যেটাই হোয়াটসঅ্যাপে বা ফেসবুকে পাঠান, তার ওপর দোকানের নাম বসিয়ে দিন। শিক্ষকরা নিজের বানানো নোট বা প্রশ্নপত্র শেয়ার করার আগে নিজের নাম বসাতে পারেন। আর ফ্রিল্যান্সাররা ক্লায়েন্টকে স্যাম্পল পাঠানোর সময় “SAMPLE” লিখে দিলে ক্লায়েন্ট আর সেই ফাইল দিয়ে কাজ চালিয়ে নিতে পারবে না — পেমেন্ট না করে উপায় থাকবে না।
ধাপ ১ — PDF ফাইলটা তুলুন
প্রথমে Watermark PDF টুলটা খুলুন। সামনে একটা বড় বাক্স দেখবেন, লেখা “Drop your PDF here”। Select PDF file বোতামে চাপ দিয়ে আপনার ফাইলটা বেছে নিন। ফোন থেকেও একইভাবে করা যায় — ফাইল ম্যানেজার থেকে PDF বেছে নিলেই হবে।

একটা কথা: ফাইলটা আপনার ব্রাউজারেই থাকে, কোথাও আপলোড হয় না। তাই ব্যক্তিগত বা দোকানের ভেতরের কাগজপত্র নিয়েও নিশ্চিন্তে কাজ করা যায়।
ধাপ ২ — কী লিখবেন, কেমন দেখাবে ঠিক করুন
ফাইল উঠে গেলেই নিচে একটা লেখার ঘর আসবে। এখানেই ওয়াটারমার্কের লেখাটা লিখতে হবে। আমি সাধারণত দোকানের নাম লিখি। আপনি চাইলে নিজের নাম, মোবাইল নম্বর বা শুধু “SAMPLE” লিখতে পারেন — যেটা আপনার কাজে লাগবে সেটাই।
লেখার নিচে কয়েকটা সেটিংস থাকে। Layout-এ “One, in the centre” রাখলে প্রতিটা পাতার মাঝখানে একবার করে লেখাটা বসবে। Angle-এ “Diagonal (-45°)” দিলে লেখাটা আড়াআড়ি হয়ে বসে — এটাই আমার পছন্দ, কারণ আড়াআড়ি লেখা চোখে পড়ে বেশি, আবার মূল লেখা পড়তেও বাধা দেয় না। Colour-এ Grey রাখুন, Text size 48 ঠিক আছে, আর Transparency 70% রাখলেই লেখাটা হালকা দেখাবে — মূল কনটেন্ট ঢেকে যাবে না।

তবে একটা ভুল অনেকেই করে — গাঢ় কালো রঙে বড় অক্ষরে লিখে ফেলে। তাতে আসল লেখা ঢাকা পড়ে যায়, ফাইলটা আর পড়ার মতো থাকে না। ওয়াটারমার্কের কাজ ছাপ রাখা, পাতা নষ্ট করা নয়। তাই হালকা রঙ আর মাঝারি সাইজেই থাকুন।
ধাপ ৩ — Add Watermark চেপে ডাউনলোড করুন
সব ঠিক থাকলে নিচের লাল Add Watermark বোতামটা চাপুন। কয়েক সেকেন্ডের মধ্যেই লেখা আসবে — “Your PDF is ready”। আমি যখন ২ পাতার একটা ফাইল (২২০৪ KB) দিয়ে পরীক্ষা করেছিলাম, নতুন ফাইলটা হয়েছিল ২২০২.৫ KB — মানে সাইজ প্রায় একই থাকে, বাড়েও না।

এবার Download PDF চাপলেই ওয়াটারমার্ক দেওয়া ফাইলটা আপনার ফোনে বা কম্পিউটারে নেমে যাবে। এই কপিটাই শেয়ার করবেন। আর আসল ফাইলটা — যেটাতে ওয়াটারমার্ক নেই — সেটা আলাদা করে নিজের কাছে রেখে দিন। পরে দরকার হলে সেটা থেকেই আবার কাজ করা যাবে।
দুটো ছোট টিপস, কাজে লাগবে
প্রথমত, একই লেখা সব ফাইলে ব্যবহার করুন। দোকানের নাম যদি প্রতিটা PDF-এ একইভাবে থাকে, মানুষ আস্তে আস্তে নামটা চিনতে শুরু করবে — এটাই আসলে ফ্রি ব্র্যান্ডিং। দ্বিতীয়ত, স্যাম্পল পাঠালে লেখাটা একটু বড় আর একটু কম স্বচ্ছ রাখুন, যাতে কেউ স্ক্রিনশট নিয়ে চালিয়ে দিতে না পারে। তবে আসল কাস্টমারকে দেওয়ার ফাইলে আবার হালকা রাখাই ভালো — ওরা তো পড়বে।
সচরাচর জিজ্ঞাসা
ওয়াটারমার্ক দিলে ফাইলের সাইজ কি বেড়ে যায়?
না, প্রায় একই থাকে। আমার পরীক্ষায় ২২০৪ KB ফাইল হয়েছিল ২২০২.৫ KB। হোয়াটসঅ্যাপে পাঠাতে কোনো সমস্যা হয় না।
আমার ফাইল কি ইন্টারনেটে কোথাও জমা হয়?
না। পুরো কাজটা আপনার ব্রাউজারের ভেতরেই হয়, ফাইল কোথাও আপলোড হয় না। টুলের পাতায় সেটা লেখাই আছে।
মোবাইল দিয়ে করা যায় তো?
যায়। আমি নিজে ফোন থেকেই করেছি — ব্রাউজার খুলে ফাইল বেছে নেওয়া আর বোতাম চাপা, এর বাইরে কিছু নেই।
ওয়াটারমার্ক দিলেই কি ফাইল একদম নিরাপদ?
সত্যি কথাটা হলো — পুরোপুরি নয়। কেউ চাইলে বিশেষ সফটওয়্যার দিয়ে ওয়াটারমার্ক তোলার চেষ্টা করতে পারে। তবে সাধারণ মানুষের হাতে সেটা হয় না, আর ফাইলটা দেখলেই বোঝা যায় এটা কার। আসল সুরক্ষা চাইলে ওয়াটারমার্কের সঙ্গে PDF-এ পাসওয়ার্ডও বসিয়ে দিন।
যাদের PDF নিয়মিত বাইরে পাঠাতে হয় — দোকানদার, শিক্ষক, ফ্রিল্যান্সার — তাদের জন্য দুই মিনিটের এই অভ্যাসটা অনেক ঝামেলা বাঁচায়। একবার করে দেখুন, তারপর নিজেই বুঝবেন।
Last month I scanned a signed lease on my phone and emailed it to my landlord. Ten minutes later he wrote back: “Page 3 is upside down, can you resend it?” I opened the file, tilted my head, and there it was — two pages perfect, one page completely flipped. The scanner app had just decided that page went the other way.
It happens more than you’d think. Phone scans, office scanners, a page fed into the machine backwards — one or two pages in an otherwise fine PDF end up sideways or upside down. And you can’t send a file like that to a client, a teacher, or a hiring manager.
Rotating it in your PDF reader doesn’t actually fix it
Here’s the mistake I made first, and most people make it too. In Chrome or Preview or Adobe Reader, there’s a rotate button. You click it, the page turns the right way up on your screen, and you close the file feeling done. Except nothing changed. That button only rotates your view. The file itself still has the page upside down — so when your landlord opens it on his phone, it’s upside down again. Print it, and it comes out of the printer sideways.
To fix it for real, the rotation has to be written into the file itself. That’s what I do now, with the free Rotate PDF tool. No app to install, no account, and the whole thing runs in your browser — your file never gets uploaded anywhere, which matters when the PDF is a contract or a tax form.
Here’s how it works — about a minute, start to finish
Step 1: Drop your PDF on the tool
Open the Rotate PDF page and click the green “Select PDF files” button, or just drag your file into the box. That’s it. The tool reads the file right there in your browser, and a few seconds later you’ll see a little thumbnail of every page.
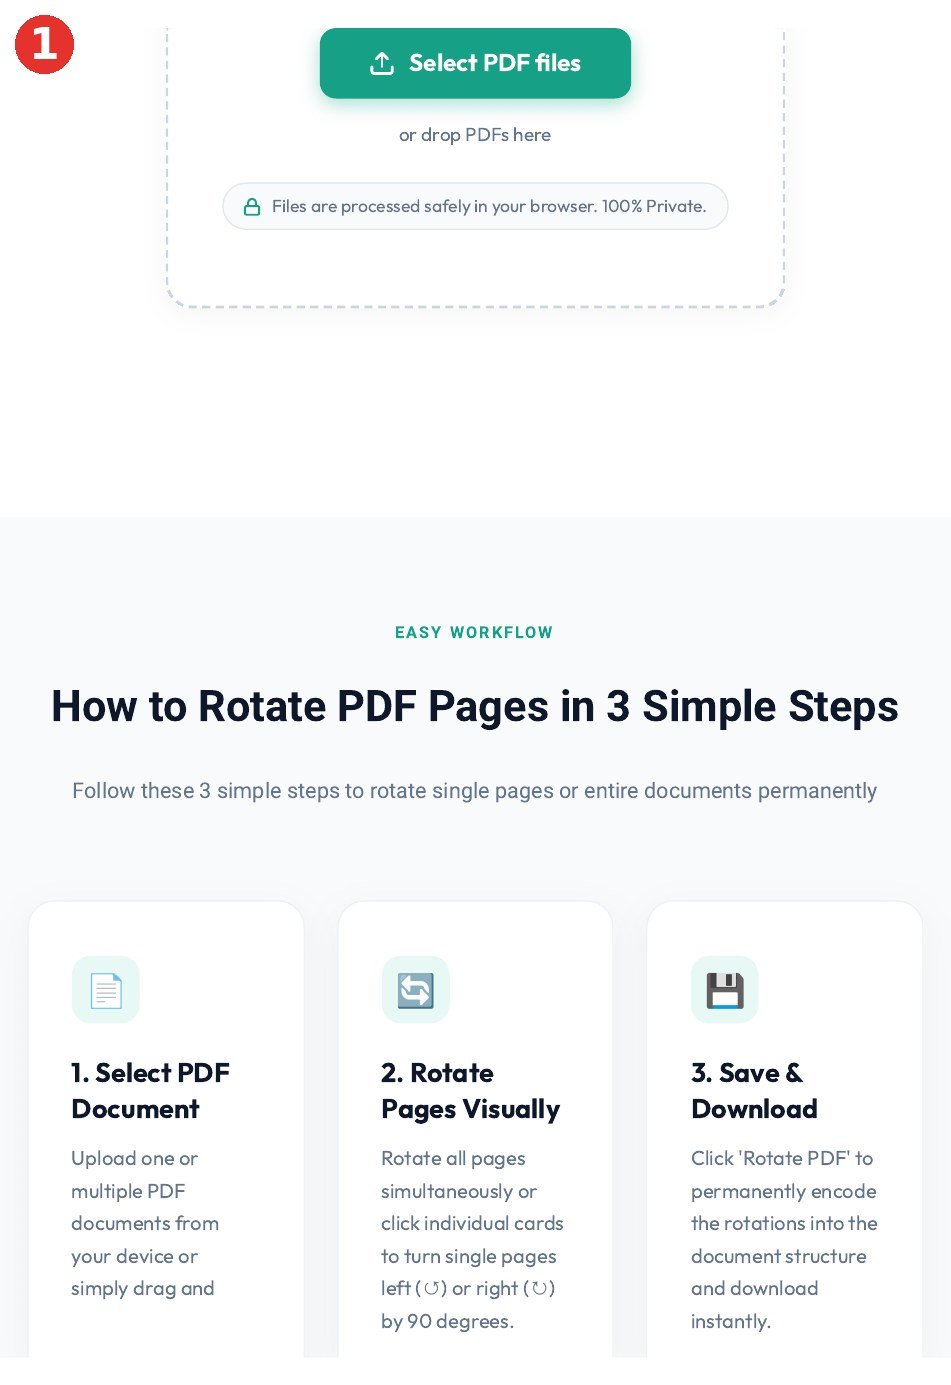
Step 2: Turn only the pages that need turning
This is the part worth slowing down for. Every page thumbnail has its own little rotate buttons on top — left or right, 90 degrees per click. An upside-down page needs two clicks. A sideways one needs one, in the right direction.
Don’t just hit “Rotate All” unless every page in the file is facing the same wrong way. I’ve done that — twenty-page handout, two pages sideways, and I rotated the whole thing and made eighteen good pages bad. Rotate only the pages that are wrong.
There’s a handy filter too: under Target Orientation you can pick just the portrait pages or just the landscape pages before turning them. Useful when a scanned report mixes a wide spreadsheet page in with normal pages and you only want to touch the wide ones.
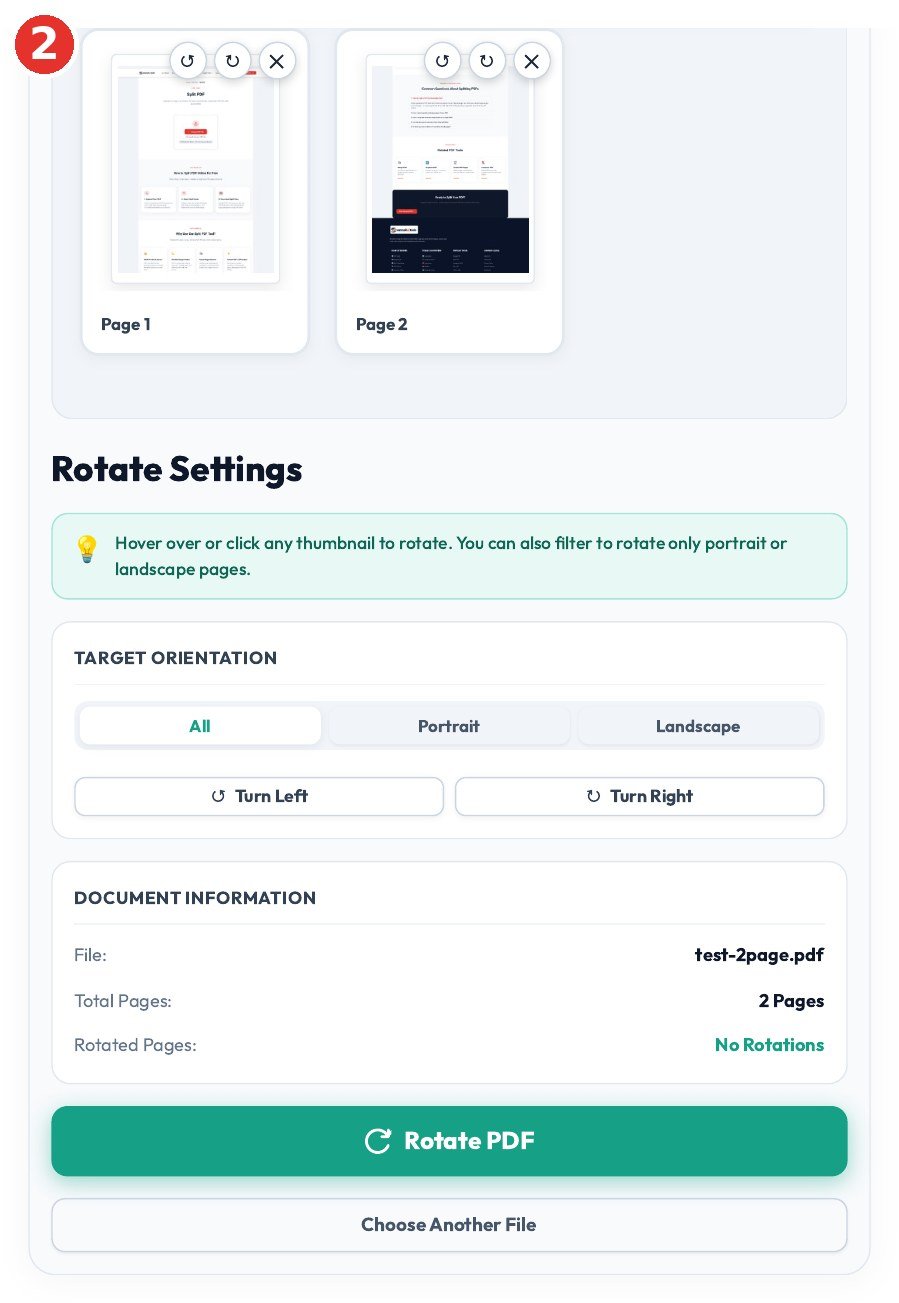
Step 3: Hit Rotate PDF and download the fixed file
Once the thumbnails all look right, press the big green “Rotate PDF” button at the bottom. A few seconds later you’ll see “PDF Successfully Rotated!” — that message means the new directions are now baked into the file itself, not just your view of it. Click “Download Rotated PDF” and you’re done.
Before you send it off, open the downloaded file and flip through it once. And keep your original for now — I once turned a page the wrong way in a hurry and was glad the original was still sitting in my downloads folder. Once you’ve checked the new file, then delete the old one. One more thing: the file size barely changes. Rotating doesn’t rebuild the pages or re-compress anything, it just rewrites which way each page faces.
If you scan a lot of paper, one small habit saves you this job most of the time: keep your phone the same way up for every page. The moment you turn the phone halfway through a stack, that’s the page that comes out sideways.
Questions people usually ask
Can I rotate just one page, or does the whole file turn?
Just one page, if that’s all you need. Each page thumbnail has its own rotate buttons, so you can fix a single upside-down page and leave the rest alone. If the entire document is sideways, there are also “Rotate All Left” and “Rotate All Right” buttons for that.
Will the pages stay fixed when someone else opens the file?
Yes. That’s the whole point of doing it this way. The rotation is saved inside the PDF, so it opens the right way up on any phone, any computer, any PDF reader — and it prints the right way up too.
Does my file get uploaded to a server?
No. Everything happens in your browser. The file never leaves your device, which is why I’m comfortable using it for leases, pay stubs, and anything else I wouldn’t want sitting on a stranger’s server.
I rotated a page the wrong way. Now what?
Nothing to panic about. Upload the file again and turn that page back the other way — or just start over from your original file, which is another reason to keep it until you’ve checked the download.
That’s all there is to it. Drop the file in, turn the wrong pages, download the fixed one. Next time a scan comes out sideways, it’s a one-minute fix instead of a rescan.

গত মাসে একটা স্ক্যান করা সার্টিফিকেটের PDF জমা দিতে গিয়ে দেখি — তিন পেজের ফাইলে মাঝের পেজটা পুরো উল্টো। কম্পিউটারে খুলে ঘাড় বাঁকিয়ে পড়তে হচ্ছে। প্রিন্টের দোকানে নিয়ে গেলে ওরা হাত উল্টে বলল, “ভাই, এটা এভাবেই বেরোবে।” অথচ ফাইলটা আমার দরকার ছিল সেদিনই।
ফোন দিয়ে ছবি তুলে PDF বানালে বা স্ক্যানারে একটা পেজ উল্টো করে বসালে এই ঝামেলাটা প্রায়ই হয়। অ্যাসাইনমেন্ট, সিভি, জমির কাগজ, পরীক্ষার ফরম — যেকোনো ফাইলেই এক-দুইটা পেজ উল্টো হয়ে যেতে পারে। আর উল্টো পেজ নিয়ে কাউকে পাঠানো যায় না, প্রিন্টও দেওয়া যায় না।
PDF রিডারে ঘোরালেই কি ঠিক হয় না?
এই জায়গায় অনেকেই একটা ভুল করেন — আমিও প্রথমে করেছিলাম। Chrome বা Adobe Reader-এ Rotate বোতাম চাপলে পেজটা আপনার স্ক্রিনে সোজা দেখায় ঠিকই, কিন্তু ফাইলের ভেতরে কিছুই বদলায় না। ফাইলটা বন্ধ করে আবার খুললেই দেখবেন পেজ আগের মতোই উল্টো। আর যাকে পাঠালেন, তার ফোনে তো উল্টোই খুলবে। প্রিন্ট দিলে কাগজেও উল্টো বেরোবে।
স্থায়ীভাবে ঠিক করতে হলে পেজের দিকটা ফাইলের ভেতরে বদলে দিতে হয় — যাতে যেকোনো ফোনে, যেকোনো রিডারে, প্রিন্টেও পেজটা সোজা থাকে। আমি এখন Rotate PDF টুলটা দিয়ে সেই কাজটাই করি। কোনো অ্যাপ নামাতে হয় না, অ্যাকাউন্টও লাগে না — ব্রাউজারেই হয়ে যায়।
যেভাবে করবেন — ১ মিনিটের কাজ
ধাপ ১: PDF ফাইলটা তুলুন
টুলের পেজ খুলে সবুজ “Select PDF files” বোতামে ক্লিক করুন, অথবা ফাইলটা টেনে এনে বাক্সের ভেতরে ছেড়ে দিন। একটা কথা জেনে রাখা ভালো — ফাইলটা আপনার ব্রাউজারেই থাকে, কোথাও আপলোড হয় না। তাই সার্টিফিকেট বা জমির কাগজের মতো ব্যক্তিগত ফাইল নিয়ে ভয়ের কিছু নেই।
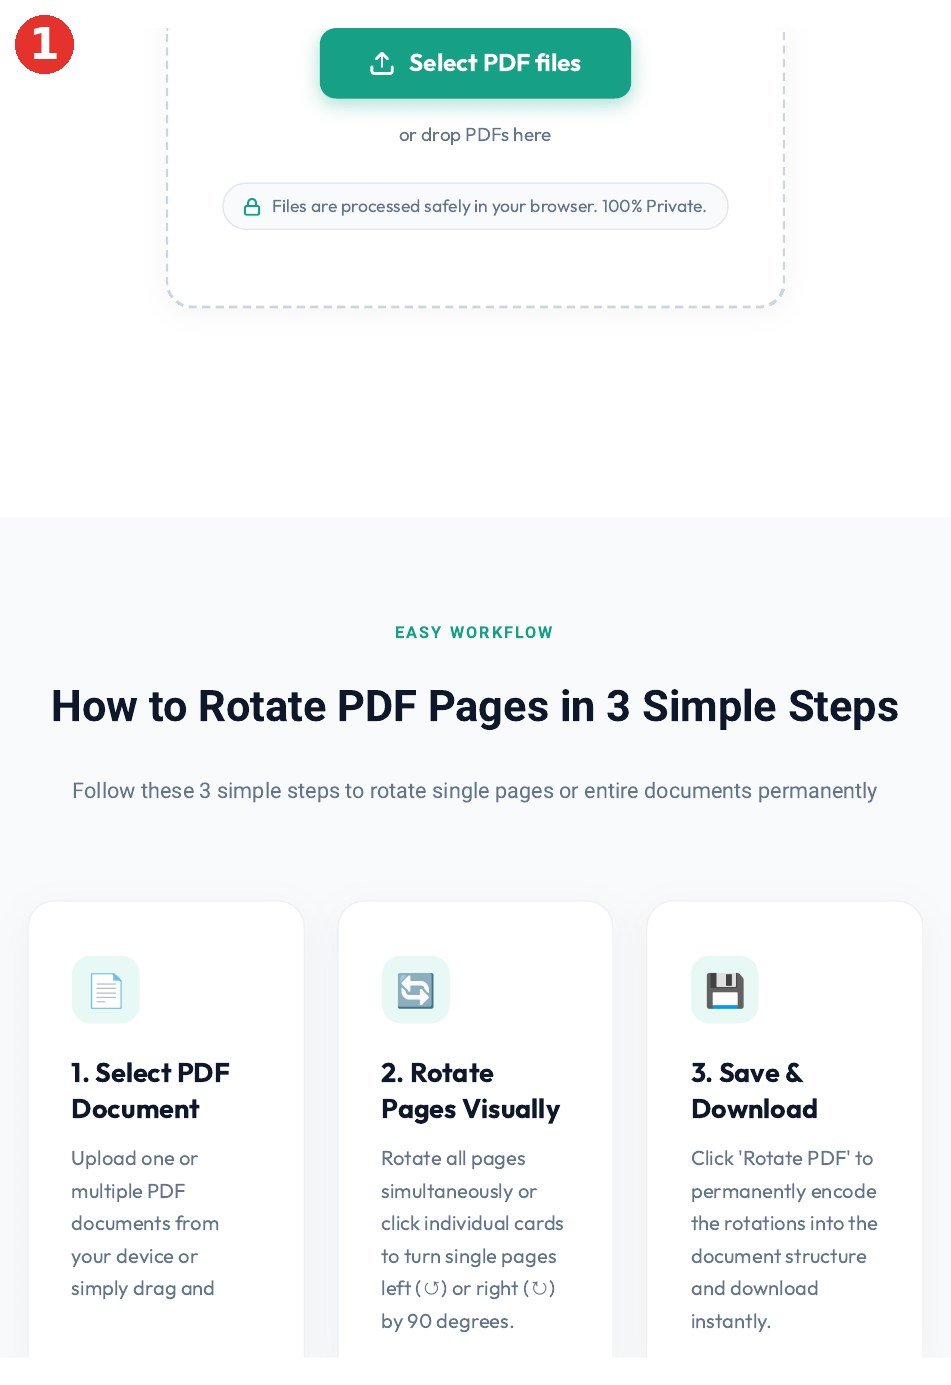
ধাপ ২: কোন পেজ ঘোরাবেন, সেটা ঠিক করুন
ফাইল উঠলেই প্রতিটা পেজের ছোট ছবি দেখাবে। এবার শুধু যে পেজটা উল্টো, সেটার উপরের ঘোরানোর বোতাম চাপুন — বামে ঘোরাতে ↺, ডানে ঘোরাতে ↻। পুরো ফাইলের সব পেজ একসাথে ঘোরাতে চাইলে উপরে “Rotate All Left” বা “Rotate All Right” আছে।
আমার পরামর্শ — গোটা ফাইল না ঘুরিয়ে শুধু উল্টো পেজগুলোই ঘোরান। ধরুন, ২০ পেজের ফাইলে ২টা পেজ উল্টো — সব ঘোরালে বাকি ১৮টা উল্টো হয়ে যাবে। আর একটা কাজের জিনিস আছে: Target Orientation থেকে শুধু Portrait বা শুধু Landscape পেজগুলো বেছে ঘোরানো যায়। প্রতিবার এক ক্লিকে ৯০ ডিগ্রি ঘোরে — পুরো উল্টো পেজ সোজা করতে দুইবার চাপতে হবে।
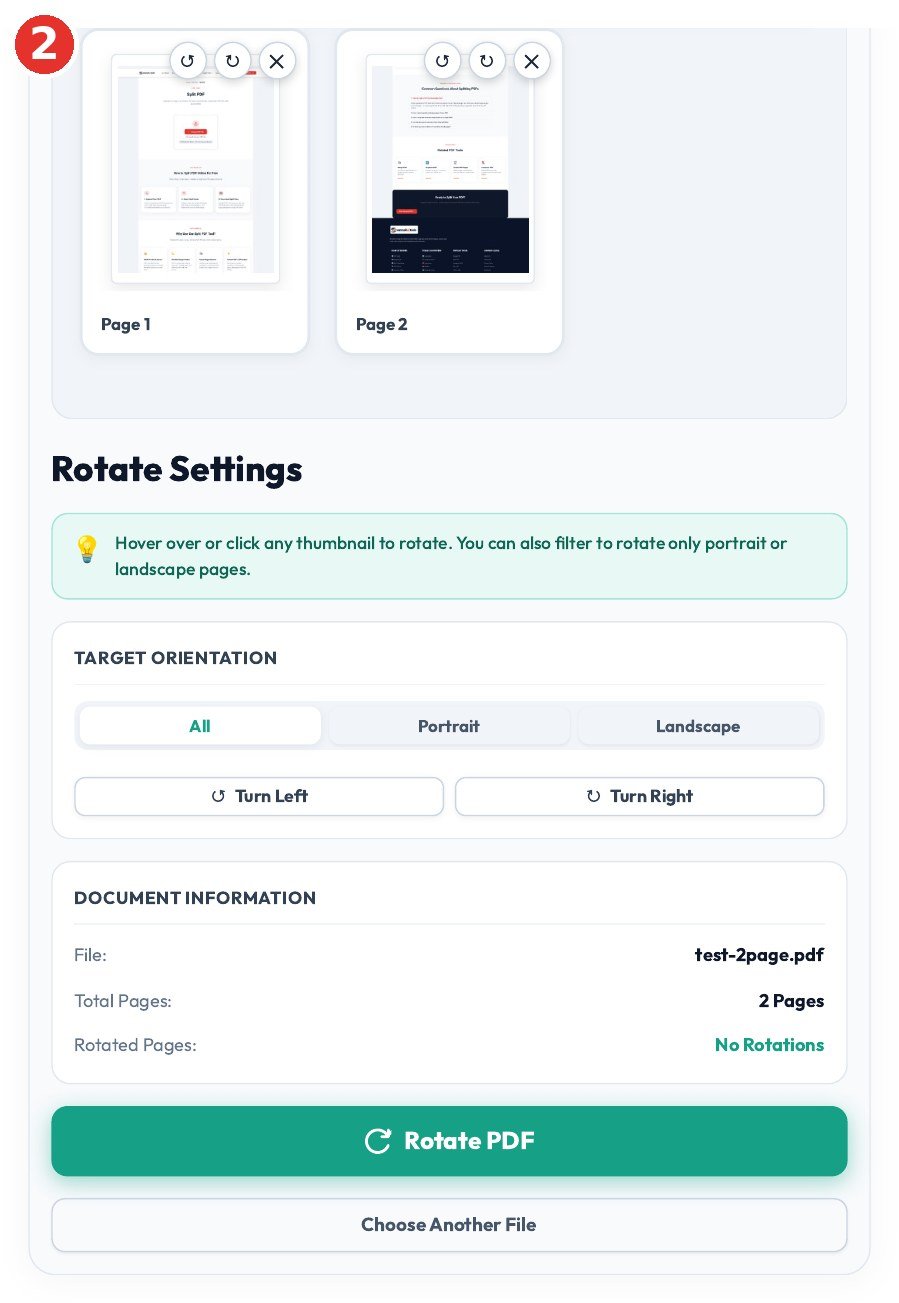
ধাপ ৩: Rotate PDF চাপুন, ডাউনলোড করুন
পেজগুলো ঠিকমতো ঘুরেছে কিনা একবার দেখে নিন, তারপর নিচের সবুজ “Rotate PDF” বোতাম চাপুন। কয়েক সেকেন্ডেই “PDF Successfully Rotated!” লেখা আসবে — এর মানে ঘোরানোটা ফাইলের ভেতরে স্থায়ীভাবে বসে গেছে। এবার “Download Rotated PDF” চাপলেই নতুন ফাইলটা ডাউনলোড হবে।
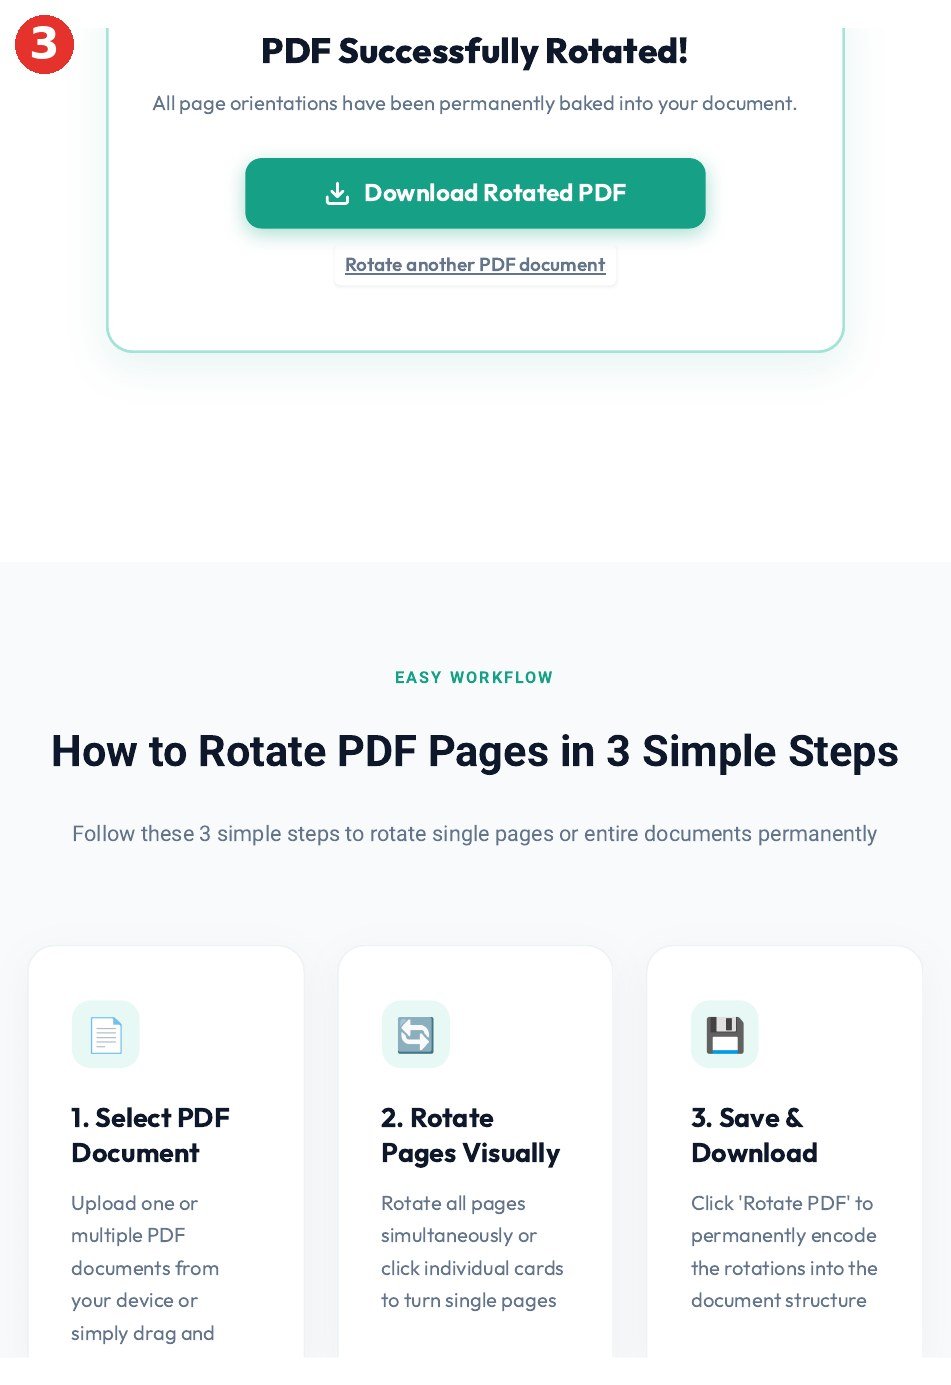
ডাউনলোড করা ফাইলটা খুলে একবার দেখে নিন সব পেজ সোজা আছে কিনা — তারপর জমা দিন বা প্রিন্টে পাঠান। আর একটা ছোট সতর্কতা: মূল ফাইলটা হুট করে ডিলিট করবেন না। আমি একবার তাড়াহুড়োয় ভুল দিকে ঘুরিয়ে ফেলেছিলাম — ভাগ্যিস মূল ফাইলটা ছিল, আবার ঠিক করে নিয়েছিলাম। নতুন ফাইল ঠিক আছে দেখে তারপর পুরনোটা সরান।
ফোন দিয়ে ছবি তুলে PDF বানানোর সময় একটা অভ্যাস করলে এই ঝামেলাটা অনেক কমে — সব পেজ একই দিকে রেখে ছবি তুলুন, মাঝখানে ফোনটা ঘোরাবেন না। তবু এক-দুইটা পেজ উল্টে গেলে ভয় নেই, এই টুলটা তো আছেই। ঘোরানোর পর ফাইলের সাইজ প্রায় একই থাকে — এটা শুধু পেজের দিক বদলায়, ভেতরের লেখা বা ছবি নতুন করে বানায় না।
সচরাচর জিজ্ঞাসা
শুধু একটা পেজ ঘোরানো যাবে, নাকি পুরো ফাইলই ঘুরবে?
দুটোই করা যায়। প্রতিটা পেজের ছবির উপরে আলাদা ঘোরানোর বোতাম আছে — যেটা দরকার শুধু সেটাই ঘোরান। আবার সব পেজ একসাথে ঘোরাতে চাইলে “Rotate All Left” বা “Rotate All Right” চাপুন।
ঘোরানোর পর কি সবার ফোনে সোজা দেখাবে?
হ্যাঁ। এই টুল ঘোরানোটা ফাইলের ভেতরে স্থায়ীভাবে লিখে দেয়, শুধু দেখার সময় ঘোরায় না। তাই ফাইলটা যেই খুলুক — ফোনে, কম্পিউটারে, বা প্রিন্টে — পেজ সোজাই থাকবে।
আমার ফাইল কি কোথাও আপলোড হবে?
না। পুরো কাজটা আপনার ব্রাউজারের ভেতরেই হয়, ফাইল সার্ভারে যায় না। সার্টিফিকেট, জমির কাগজ বা চাকরির ফাইলের মতো ব্যক্তিগত কাগজপত্র নিয়ে তাই নিশ্চিন্তে ব্যবহার করতে পারেন।
ভুল দিকে ঘুরিয়ে ফেললে কী করব?
ঘাবড়ানোর কিছু নেই। ফাইলটা আবার টুলে তুলে উল্টোদিকে ঘুরিয়ে নিন, অথবা মূল ফাইলটা থেকে আবার শুরু করুন। এজন্যই ডাউনলোডের পর মূল ফাইলটা সাথে সাথে ডিলিট না করাই ভালো।
উল্টো পেজের ফাইল নিয়ে আর ঘাড় বাঁকিয়ে পড়তে হবে না। ফাইলটা তুলুন, উল্টো পেজটা ঘুরিয়ে নিন, ডাউনলোড করে সোজা ফাইলটাই পাঠান — পুরো কাজটা এক মিনিটের।

I uploaded a video I was genuinely proud of once. Good lighting, a decent edit, a topic people actually search for. A week later it had 47 views — and most of those were me refreshing the page to see if the number had moved. The tags I’d typed in? “video, youtube, funny, 2026.” Basically nothing YouTube could use.
That was the day I stopped treating tags as an afterthought. They’re not magic, and anyone who tells you a tag tool will make you go viral is selling something. But tags are how you tell YouTube, in its own language, what your video is actually about — and when they match the phrases people really type into search, they quietly do their job.
Why most small channels waste their tags
YouTube gives you 500 characters of tags per video. Most small creators use about 40 of them, on single words nobody searches for. “Cooking” is not a tag that helps you. “How to make biryani at home” is — because that’s the sentence a real person types. The trick is finding the longer, specific phrases people actually search, and fitting as many of them as you can inside that 500-character box.
Doing that by hand — guessing phrases, counting characters in your head — is a miserable way to spend twenty minutes before every upload. So I don’t.
Generate your tags in about a minute
I use the free YouTube Tag Generator on this site. It builds tag ideas from real YouTube autocomplete searches, so the phrases it suggests are ones people genuinely type. No account, no install, nothing to download. Here’s how it goes:
Step 1: Type your video’s topic

Open the tool and type the main keyword of your video — the phrase you’d want to show up for. One keyword is enough; the tool does the expanding. Be as specific as your video is. Vague topics get vague tags, and vague tags help nobody.
Step 2: Hit Generate Tags

That’s it. One click. The tool goes off and pulls the autocomplete phrases real viewers have searched around your keyword. You don’t type anything else, and there’s no settings page to fiddle with — which, honestly, is the way it should be for a two-minute job.
Step 3: Copy the tags and paste them into YouTube Studio

For my biryani example it came back with 13 tags that fit inside the 500-character limit, picked from 225 suggestions — 473 characters used, with a little bar showing how full the box is. There’s a copy-ready list at the bottom and a big purple Copy Tags button. Paste them into YouTube Studio under Content, then your video, then Details, then Tags (it’s under “Show more” if you don’t see it), and hit Save.
Two things worth noticing on that results page. First, the “Didn’t fit” section underneath: extra suggestions that ran past the 500-character limit. If one of the fitted tags looks off-topic, swap it for one of these by hand — they’re your bench. Second, the Download .txt button, which is handy if you make similar videos every week and want to keep a little tag bank for your channel instead of starting from scratch each time.
A few things I wish someone had told me earlier
Your first tag should be your exact main keyword — the same phrase as your title if you can manage it. It tells YouTube, right up front, what the video is.
Don’t copy a big channel’s tags and expect their results. YouTube knows the difference between a channel with years of authority on a topic and a new one. Tags that fit your video beat tags that fit someone else’s.
And keep perspective. Tags are a small signal. Your title, your thumbnail, and whether people actually watch past the first thirty seconds matter far more. Tags are the last 2% — worth a minute of your time, not an hour of it.
Frequently asked questions
Do YouTube tags still matter in 2026?
Yes, but less than they used to. They help YouTube categorise your video, which matters most when your channel is small and YouTube doesn’t know who to show your videos to yet. They won’t rescue a video nobody clicks on — that’s the thumbnail and title’s job.
How many tags should I use?
As many good ones as fit in 500 characters. Ten to fifteen specific phrases beat thirty single words every time. If you’re filling the box with one-word tags like “food” and “recipe” just to use up space, stop — that’s not helping.
Can I copy tags from a popular video?
You can look at them for ideas, sure. But pasting another channel’s tags word for word rarely does anything for you, and irrelevant tags can actually hurt — YouTube has said misleading tags can get a video penalised. Use phrases that genuinely describe your video.
Where exactly do I paste the tags?
In YouTube Studio, go to Content, click the video, open Details, scroll down and click “Show more” — the Tags box is at the bottom. Paste, save, done. You can edit tags any time after publishing too, so if a video takes off for a different search term than you expected, you can adjust.
That’s the whole routine: one keyword in, a copy-ready list out, paste it into Studio. A minute per video, and your tags finally say something YouTube can use. Spend the time you save on the thumbnail — that’s where the clicks actually come from.
গত মাসে আমার এক পরিচিত রান্নার চ্যানেলের ভিডিও দেখলাম — বিরিয়ানির রেসিপি, শুটিংও সুন্দর, কথা বলাও গোছানো। কিন্তু এক সপ্তাহ পর ভিউ মাত্র ৪৩। ভিডিও খারাপ বলে নয় — ইউটিউব বুঝতেই পারছিল না ভিডিওটা আসলে কী নিয়ে, কাকে দেখাবে। ট্যাগের ঘরটা ছিল একদম ফাঁকা।
আপনার সাথেও কি এমন হয়? ভিডিও বানাতে ঘণ্টার পর ঘণ্টা যায়, আপলোড দেন, তারপর ভিউ আটকে থাকে দুই অঙ্কে। টাইটেল আর থাম্বনেইল নিয়ে তো সবাই ভাবে, কিন্তু ট্যাগের ঘরটা বেশিরভাগ সময় খালি পড়ে থাকে — আর ওই খালি ঘরটাই সার্চে আপনার ভিডিওকে পিছিয়ে দেয়।
ট্যাগ আসলে কী কাজ করে — আর কী করে না
আগে একটা সত্যি কথা বলে নিই, যাতে পরে হতাশ না হন। ট্যাগ দিলেই ভিডিও ভাইরাল হয়ে যাবে — এমনটা নয়। ইউটিউব নিজেই বলে, আজকাল ডিসকভারিতে ট্যাগের ভূমিকা খুবই কম। ভিডিওর টাইটেল, থাম্বনেইল আর মানুষ কতক্ষণ দেখছে — এই তিনটাই আসল।
তাহলে ট্যাগ দিয়ে লাভ কী? ট্যাগ ইউটিউবকে বোঝায় আপনার ভিডিওটা ঠিক কোন বিষয়ের। কেউ যখন “how to make biryani at home” লিখে সার্চ করে, বা বিরিয়ানির ভিডিও দেখার পর পাশে সাজেস্টেড ভিডিও আসে — তখন ট্যাগ সেই মিলটা ধরতে সাহায্য করে। আর একটা কাজে ট্যাগ দারুণ: আপনার বিষয়ের ভুল বানান বা কাছাকাছি শব্দে কেউ সার্চ করলেও ভিডিওটা পাওয়া যায়।
একটা সীমা মাথায় রাখবেন — এক ভিডিওতে সব ট্যাগ মিলিয়ে সর্বোচ্চ ৫০০ অক্ষর। এর বেশি লিখলে ইউটিউব নিজেই কেটে দেয়, আপনি টেরও পাবেন না। তাই ৫০০ অক্ষরের ভেতরে সবচেয়ে কাজের ট্যাগগুলো গুছিয়ে বসানোই আসল কাজ।
১ মিনিটে ট্যাগ বানানোর নিয়ম
নিজে বসে বসে ট্যাগ ভাবতে গেলে আধা ঘণ্টা চলে যায়, তবু মনে হয় কিছু বাদ পড়ল। আমি এখন YouTube Tag Generator টুলটা দিয়ে করি — ভিডিওর বিষয় লিখলেই সার্চের আসল সাজেশন থেকে ট্যাগ বানিয়ে দেয়, ৫০০ অক্ষরের হিসাবটাও নিজেই করে নেয়।
ধাপ ১: টুলটা খুলুন
লিংকে ক্লিক করলেই টুলের পেজ খুলবে। কোনো সাইন-আপ নেই, কিছু ডাউনলোড করতে হয় না — বক্সটা সামনেই পাবেন।
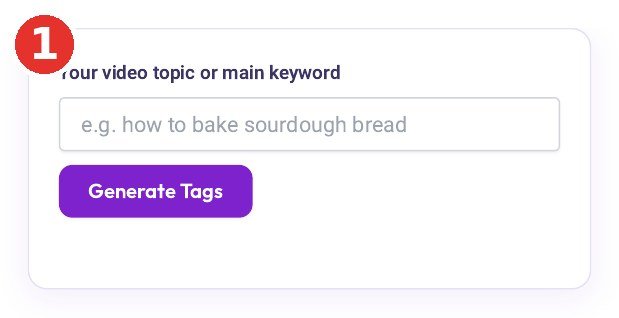
ধাপ ২: ভিডিওর বিষয়টা লিখুন
বক্সে আপনার ভিডিওর মূল বিষয়টা লিখুন — ছোট আর নির্দিষ্ট করে। আমি যেমন লিখেছি “how to make biryani at home”। পুরো একটা বাক্য লিখবেন না, আবার একটাই শব্দও নয় — দুই থেকে পাঁচ শব্দের কি-ওয়ার্ড সবচেয়ে ভালো কাজ করে।
একটা ছোট টিপস: বিষয়টা ইংরেজিতে লিখুন, যদি আপনার দর্শক ইংরেজিতে সার্চ করে। বাংলাদেশের অনেকেই ইউটিউবে রেসিপি খোঁজে ইংরেজিতে — “how to make biryani” লিখে। আপনার ভিডিও বাংলায় হলেও ট্যাগ ইংরেজিতে দিলে সার্চে পাওয়ার সম্ভাবনা বেশি।
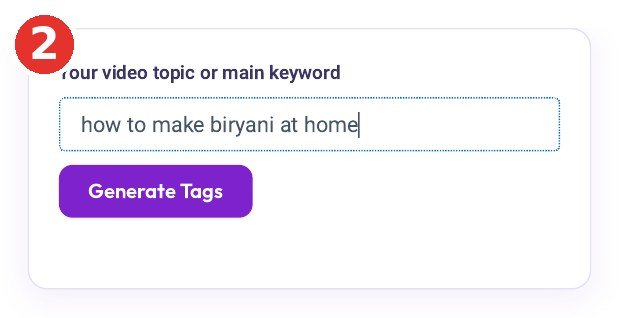
ধাপ ৩: Generate Tags চাপুন, কপি করে Studio-তে বসান
“Generate Tags” বোতামে ক্লিক করলেই ট্যাগ তৈরি। আমার এই উদাহরণে ১৩টা ট্যাগ এসেছে — মোট ৪৭৩ অক্ষর, ৫০০-র সীমার ভেতরে। টুলটা নিজেই হিসাব করে সবচেয়ে কাজের ট্যাগগুলো আগে রাখে, যাতে সীমা পেরিয়ে গুরুত্বপূর্ণ ট্যাগ বাদ না যায়।
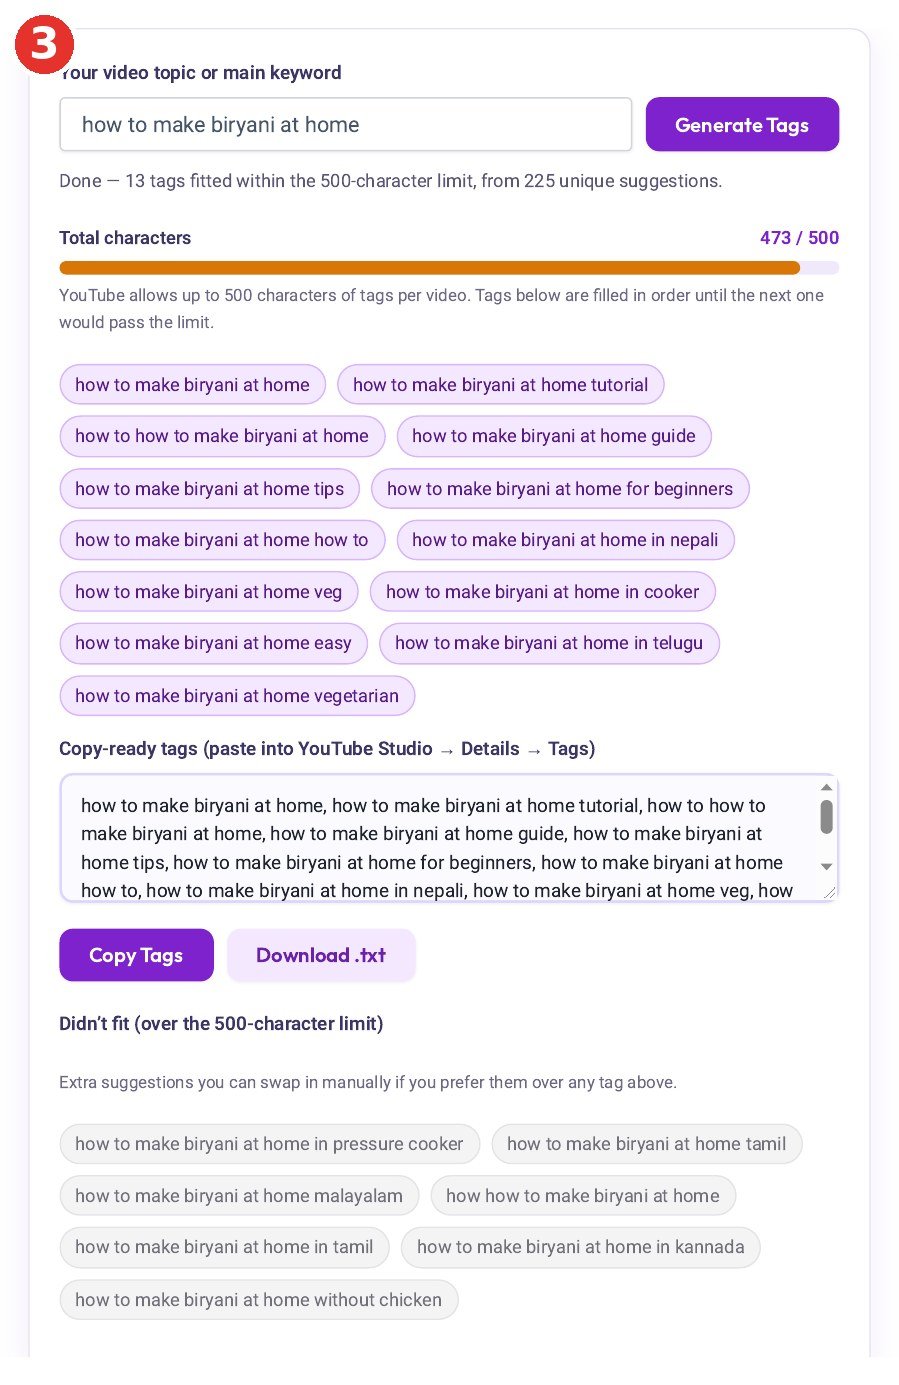
এবার “Copy Tags” চাপুন, তারপর YouTube Studio খুলে ভিডিওর Details-এ গিয়ে Tags-এর ঘরে পেস্ট করে দিন। ব্যস, কাজ শেষ। একটা জিনিস খেয়াল রাখবেন — ট্যাগের তালিকার নিচে “Didn’t fit” বলে আরও কিছু সাজেশন থাকে, যেগুলো ৫০০ অক্ষরে জায়গা পায়নি। ওখান থেকে কোনোটা আপনার বেশি পছন্দ হলে, উপরের কোনো ট্যাগের বদলে নিজে বসিয়ে নিতে পারেন।
যে ভুলগুলো আমি নিজে করতাম
আগে আমিও ভাবতাম ট্যাগ যত বেশি, ভিউ তত বেশি। তাই ভিডিওতে যা পেতাম তাই বসাতাম — রান্নার ভিডিওতে “t-series”, “viral video”, “funny” পর্যন্ত। পরে বুঝেছি, এতে উল্টো ক্ষতি। অপ্রাসঙ্গিক ট্যাগ দেখে ইউটিউব কনফিউজড হয় — ভিডিওটা আসলে কাদের দেখাবে, সেটাই ঠিক করতে পারে না।
আরেকটা ভুল — একই ট্যাগ বারবার লেখা। “biryani”, “biriyani”, “biryani recipe”, “biryani recipe bangla” — কাছাকাছি হলেও এগুলো আলাদা সার্চ, তাই ঠিক আছে। কিন্তু হুবহু একই শব্দ দুইবার লিখলে কোনো লাভ নেই, শুধু ৫০০ অক্ষর নষ্ট হয়।
সবচেয়ে বড় ভুলটা হলো ট্যাগের উপর পুরো ভরসা করে বসা। ট্যাগ শুধু সহায়ক — ভিডিওর টাইটেল পরিষ্কার না হলে, থাম্বনেইলে ক্লিক না এলে, ট্যাগ কিছুই করতে পারবে না। আগে টাইটেল আর থাম্বনেইল ঠিক করুন, তারপর এই টুল দিয়ে ট্যাগ গুছিয়ে নিন।
সচরাচর জিজ্ঞাসা
ট্যাগ দিলেই কি ভিউ বাড়বে?
সরাসরি না। ট্যাগ ভিডিওকে সার্চ আর সাজেস্টেড ভিডিওতে পৌঁছাতে সাহায্য করে, কিন্তু মানুষ ক্লিক করবে কিনা সেটা নির্ভর করে টাইটেল আর থাম্বনেইলের উপর। ভালো ট্যাগ + ভালো টাইটেল — দুটো মিলেই কাজ হয়।
এক ভিডিওতে কতগুলো ট্যাগ দেওয়া যায়?
সংখ্যার কোনো বাঁধা নেই, বাঁধা অক্ষরে — সব ট্যাগ মিলিয়ে সর্বোচ্চ ৫০০ অক্ষর। সাধারণত ১০ থেকে ১৫টা ট্যাগেই সীমাটা ভরে যায়। এই টুলটা ৫০০ অক্ষরের ভেতরে যতগুলো ধরে, ততগুলোই দেয়, তাই নিজে হিসাব করতে হয় না।
বাংলায় ট্যাগ লেখা যায়?
যায় — ইউটিউব যেকোনো ভাষার ট্যাগ নেয়। তবে প্রশ্ন হলো, আপনার দর্শক কীভাবে সার্চ করে। বাংলাদেশের দর্শক রেসিপি, টেক টিপস, গেমিং — এসবের বেশিরভাগ সার্চ করে ইংরেজিতে বা রোমান বাংলায়। তাই ভিডিও বাংলায় হলেও ট্যাগ ইংরেজিতে দিলে বেশিরভাগ ক্ষেত্রে ভালো ফল পাবেন। আর যদি ভিডিওটা শুধু বাংলা-সার্চ করা দর্শকের জন্য হয়, তাহলে দুই-একটা বাংলা ট্যাগও মিশিয়ে দিতে পারেন।
এই টুলটা কি ফ্রি?
হ্যাঁ, সম্পূর্ণ ফ্রি — কোনো অ্যাকাউন্ট লাগে না। আপনার লেখা কি-ওয়ার্ড কোথাও জমা হয় না, টুলটা সরাসরি ইউটিউবের পাবলিক সাজেশন থেকে ট্যাগ আনে।
ভিডিও বানানোর কষ্টটা তো আপনি করছেনই — ট্যাগের জন্য আর সময় নষ্ট কেন? পরের ভিডিও আপলোডের আগে এক মিনিট সময় নিয়ে ট্যাগগুলো গুছিয়ে নিন। ছোট কাজ, কিন্তু ভিডিওটা সঠিক মানুষের কাছে পৌঁছাতে এটাই অনেক সময় পার্থক্য গড়ে দেয়।

You know the feeling. You type a whole paragraph, look up at the screen, and realise caps lock was on the entire time. Everything is SHOUTING. And now you have two choices: retype the lot, or fix it in about five seconds.
I take the second option every time. Here’s the way I do it.
Step 1: Open the free case converter
Go to the Case Converter. No sign-up, no download, nothing to install. It loads in a second and the whole thing is one page — a box to type in, a row of buttons, and a result box underneath.

Step 2: Paste your text in
Click the top box and paste whatever needs fixing — a sentence, a paragraph, a whole email draft. I usually paste from Word or Google Docs, but it works just as well with text copied straight out of a form or a chat window. You can also just type directly into the box.
The mistake I see people make here is retyping the text by hand first. Don’t. Paste the broken version as it is — that’s the whole point of the tool.

Step 3: Click the case you want — then copy
One click on a button and the result appears in the box underneath, instantly. For my sample sentence I hit UPPERCASE, and “hello world this is a sample sentence” came back as “HELLO WORLD THIS IS A SAMPLE SENTENCE” — along with a little count underneath: 7 words, 37 characters, 1 line.
Then hit the green Copy Result button and paste it wherever it needs to go. Done. The whole thing takes less time than finding the caps lock key.

Which case should you actually pick?
There are twelve buttons on the tool, and honestly you’ll use four of them most of the time:
- UPPERCASE — for headings, labels, or when a form wants everything in capitals. Use it sparingly in emails; all-caps reads like shouting.
- lowercase — handy when you’ve pasted something that came in shouting, or when you’re normalising text before comparing it.
- Title Case — my default for headings and titles. It capitalises the first letter of every word, so “how to change text case online” becomes “How To Change Text Case Online”.
- Sentence case — the one people actually want most of the time. Only the first word gets a capital, the rest stays lowercase, the way a normal sentence looks.
The others are for specific jobs. camelCase, PascalCase, snake_case and kebab-case are the ones developers reach for — variable names, file names, URLs. aLtErNaTiNg is for memes and nothing else, and I’ll say it plainly: it looks fun for about ten seconds.
Two buttons people overlook: Reverse text flips your text backwards, and Remove extra spaces cleans up double spaces left over from sloppy copy-pasting. That second one has saved more of my documents than I’d like to admit.
A couple of things to watch out for
Title Case capitalises every word, including the ones you’d rather leave alone — acronyms like NASA or USA come out fine, but a word like “iPhone” gets mangled into “IPhone”, and “McDonald” becomes “Mcdonald”. If your text has brand names or proper nouns with odd capitalisation, give the result a quick scan before you paste it anywhere important.
And one small habit that saves trouble: copy the result, paste it where it belongs, then read it once. The tool does the mechanical part perfectly — the judgement part is still yours.
Frequently asked questions
Does it work with long text?
Yes. Paste a whole article if you like — the conversion happens instantly in your browser, and there’s no word limit I could hit in normal use.
Is my text uploaded anywhere?
No. The conversion happens in your browser — nothing is sent to a server. The tool even says so under the button. I wouldn’t paste passwords or private notes into any online tool, but for everyday text this one never sees your words leave your own computer.
What’s the difference between Title Case and Sentence case?
Title Case capitalises every word (“The Quick Brown Fox”), while Sentence case only capitalises the first word (“The quick brown fox”). Headings usually want Title Case; normal sentences want Sentence case.
Can I use it for code?
That’s exactly what camelCase, PascalCase, snake_case and kebab-case are there for. Type a phrase like “user account settings”, hit snake_case, and you get “user_account_settings” — ready to paste into your code.
So next time caps lock betrays you — or a form demands the opposite case to the one you’ve got — don’t retype anything. Paste it in, click once, copy it out.